Systems administration archived articles

Subscribe to the RSS feed for this category only

Systems administration19 Sep 2017 at 20:38 by Jean-Marc Liotier

TL;DR: I made a Xerox WorkCentre 6515dn PPD file and tested it working with CUPS on Debian.

So, I bought a fancy multifunction scanner/printer: the Xerox WorkCentre 6515dn – solid gear all around, considerably more so than the damned Canon i-SENSYS MF724Cdw it replaces. But, as usual, great hardware is nothing without software support – and Xerox came short…

First, no PPD file was to be found anywhere on the Web. The Xerox workaround: “The Generic ppd is listed in Windows downloads, so it is packaged as an EXE, but it’s just so it runs self extraction. So download and run on Windows, or within WINE or some such to grab the filles from it. Grab it here ! – fine, I found an old Windows host and used it to get the file… But why couldn’t they make that file available for download somewhere on their par-for-the-course labyrinthine support site is anyone’s guess.

Anyway, I declared the printer to CUPS and gave it that painfully extracted PPD… No luck: CUPS rejected it with the error message “Unable to open PPD file: OpenGroup without a CloseGroup first”. Here is the full diagnostic:

$ cupstestppd xr6515dn.ppd.orig
xr6515dn.ppd.orig: FAIL
**FAIL** Unable to open PPD file – OpenGroup without a CloseGroup first on line 476.
REF: Pages 45-46, section 5.2.
WARN Non-Windows PPD files should use lines ending with only LF, not CR LF.

Oh well, a PPD is just a text configuration and “open without close” problems feel familiar to anyone who has ever fed parenthesis to a computer. So, after five minutes of tinkering:

$ diff xr6515dn.ppd.orig xr6515dn.ppd
475a476,477
> *CloseGroup: /Paper/Output
>

And it works too:

$ cupstestppd xr6515dn.ppd
xr6515dn.ppd: PASS
WARN Non-Windows PPD files should use lines ending with only LF, not CR LF.
WARN Size “215×315” should be the Adobe standard name “FolioSP”.
WARN Size “B6” should be the Adobe standard name “ISOB6”.
WARN Size “4x6Postcard” should be the Adobe standard name “4×6”.
WARN DefaultGuaranteedMaxSeparations has no corresponding options.

Morale of the story: my fancy paper-processing device now nicely prints from the house’s Debian workstations and the Web is now richer with a Xerox WorkCentre 6515dn PPD file tested working with CUPS on Debian !

Debian and Networking & telecommunications and Systems administration01 Jun 2015 at 15:02 by Jean-Marc Liotier

You have a nice amplifier in a corner of the living-room, tethered to nice loudspeakers. Alas the spot where you want to control the music from is far away – maybe in another corner of the livingroom, maybe in your office room or maybe on another continent… No problem – for about 40€ we’ll let you switch your music to this remote destination just as easily as switching between the headphones and speakers directly connected to your workstation. The average narcissistic audiophile pays more than that for a RCA cable.

So, I grabbed a Raspberry Pi model B (first generation – get them cheap !), a micro-USB power supply from the spares box and a stray SD card (at least 1 GB).

First step is to set it up with an operating system. Since I love Debian, I chose Raspbian.A handy way to install Raspbian quick & easy is raspbian-ua-netinst, a minimal Raspbian unattended installer that gets its packages from the online repositories – it produces a very clean minimal setup out of the box.

So, go to raspbian-ua-netinst’s latest release page and download the .img.xz file – then put it on the SD card using ‘xzcat /path/to/raspbian-ua-netinst-<latest-version-number>.img.xz > /dev/sdX’ for which you may have to ‘apt-get install xz-utils’. Stick that card into the Raspberry Pi, connect the Raspberry Pi to Ethernet on a segment where it can reach the Internet after having been allocated its parameters through DHCP or NDP+RDNSS – and power it up.

Let raspbian-ua-netinst do its thing for about 15 minutes – time enough to find what IP address your Raspberry Pi uses (look at your DHCP server’s leases or just ‘nmap -sP’ the whole IP subnet to find a Raspberry Pi). Then log in over ssh – default root password is raspbian… Use ‘passwd’ to change it right now.

The default install is quite nice, but strangely doesn’t include a couple of important features… So ‘apt-get install raspi-copies-and-fills rng-tools’ – raspi-copies-and-fills improves memory management performance by using  a memcpy/memset implementation optimised for the ARM11 used in Raspberry Pi, rng-tools lets your system use the hardware random number generator for better cryptographic performance. To finish setting up the hardware RNG, add bcm2708-rng to /etc/modules.

Also, the default install at the time of this writing uses Debian Wheezy, which contains a Pulseaudio version too old for our purposes – we need Debian Jessie which offers Pulseaudio 5 instead of Pulseaudio 2. And anyway, Jessie is just plain better – so let your /etc/apt/sources.list look like this:

deb http://mirrordirector.raspbian.org/raspbian jessie main firmware contrib non-free rpi
deb http://archive.raspbian.org/raspbian jessie main contrib non-free rpi

Then ‘apt-get update && apt-get -y dist-upgrade && apt-get -y autoremove’… This should take a while.

Now install Pulseaudio the piece of software that will offer a receiving end to your network audio stream:  ‘apt-get install pulseaudio’. I assume you have Pulseaudio already set up on the emitter station – your favourite distribution’s default should do fine, as long as it provides Pulseaudio version 5 (use ‘pulseaudio –version’ to check that).

Pulseaudio is primarily designed to cater to desktop usage by integrating with the interactive session of a logged in user – typically under control of the session manager of whatever graphical desktop environment. But we don’t need such complex thing here – a dumb receptor devoid of any extra baggage is what we want. For this we’ll use Pulseaudio’s system mode. Pulseaudio’s documentation repeatedly hammers that running in system mode is a bad idea – “nobody should run it that way, with the exception of very few cases”… Well – here is one of those very few cases.

In their zeal to discourage anyone from running Pulseaudio in system mode, the Pulseaudio maintainers do not ship any startup script in the distribution packages – this ensures that users who don’t know what they are doing don’t stray off the beaten path of orthodox desktop usage and end up on a forum complaining that Pulseaudio doesn’t work. But it also annoys the other users, who actually need Pulseaudio to run at system startup – but that is easily fixable thanks to another creation of Lennart’s gang: all we need is a single file called a systemd unit… I copied one from this guy who also plays with Pulseaudio network streaming (but in a different way – more on that later). This systemd unit was written for Fedora, but it works just as well for Raspbian… Copy this and paste it in /etc/systemd/system/pulseaudio.service :

[Unit]
Description=PulseAudio Daemon

[Install]
WantedBy=multi-user.target

[Service]
Type=simple
PrivateTmp=true
ExecStart=/usr/bin/pulseaudio –system –realtime –disallow-exit –no-cpu-limit

Then ‘systemctl enable pulseaudio’ and ‘systemctl start pulseaudio’ – you now have a properly set up Pulseaudio daemon. Now is a good time to take a moment to consider how much more fastidious the writing of a SysVinit script would have been compared to just dropping this systemd unit in place.

Now let’s see the meat of this article: the actual setup of the audio stream. If you stumbled upon this article, you might have read other methods to the same goal, such as this one or this one. They rely on the server advertising its Pulseaudio network endpoint through Avahi‘s multicast DNS using the module-zeroconf-publish pulseaudio module, which lets the client discover its presence and so that the user can select it as an audio destination after having told paprefs that remote Pulseaudio devices should be available locally. In theory it works well and it probably works well in practice for many people but Avahi’s behaviour may be moody – or, in technical terms, subject to various network interferences that you may or may not be able to debug easily… Struggling with it led me to finding an alternative. By the way, Avahi is another one of Lennart’s babies – so that might be a factor towards Pulseaudio’s strong inclination towards integrating with it.

Discoverability is nice in a dynamic environment but, in spite of my five daughters, my apartment is not that dynamic – my office and the livingroom amplifier won’t be moving anytime soon. So why complicate the system with Avahi ? Can’t we just have a static configuration by declaring a hardcoded link once and for all ? Yes we can, with module-tunnel-sink-new & module-tunnel-source-new !

Module-tunnel-sink-new and module-tunnel-source-new are the reason why we require Pulseaudio 5 – they appeared in this version. They are a reimplementation of module-tunnel-sink, using libpulse instead of reinventing the wheel by using their own implementation of the Pulseaudio protocol. At some point in the future, they will lose their -new suffix and officially replace module-tunnel-{sink,source} – at that moment your setup may break until you rename them in your /etc/pulse configuration to module-tunnel-sink and module-tunnel-source… But that is far in the future – for today it is all about module-tunnel-sink-new and module-tunnel-source-new !

Now let’s configure this ! Remember that we configured the Raspberry Pi’s Pulseaudio daemon in system mode ? That means the relevant configuration is in /etc/pulse/system.pa (not in /etc/pulse/default.pa – leave it alone, it is for the desktop users). So add those two load-module lines to the bottom of /etc/pulse/system.pa – the first one to declare the IP addresses authorized to use the service, the second one to declare the IP address of the client that will use it… Yes – it is a bit redundant, but that is the way (two single load-module lines – don’t mind the spurious carriage return caused by this blog’s insufficient width):

load-module module-native-protocol-tcp auth-ip-acl=127.0.0.1;2001:470:ca99:4:21b:21ff:feaa:99c9

load-module module-tunnel-source-new server=[2001:470:ca99:4:21b:21ff:feaa:99c9]

It is possible to authenticate the client more strictly using a cookie file, but for my domestic purposes I decided that identification by IP address is enough – and lets leave some leeway for my daughters to have fun discovering that, spoof it and stream crap to the livingroom.

Also, as some of you may have noticed, this works with IPv6, but it works well with legacy IPv4 too – in which case the address must not be enclosed in brackets.

Anyway, don’t forget to ‘systemctl restart pulseaudio’ after configuring.

Then on the client side, add this single load-module line to the bottom of /etc/pulse/default.pa (not in /etc/pulse/system.pa – leave it alone, it is for headless endpoints and your client side is most probably an interactive X session). This is one single load-module line – don’t mind the spurious carriage return caused by this blog’s insufficient width:

load-module module-tunnel-sink-new server=[2001:470:ca99:4:ba27:ebff:fee2:ada9] sink_name=MyRemoteRaspberry

Actually I didn’t use sink_name, but I understand you might want to designate your network sink with a friendly nickname rather than an IPv6 address – though why would anyone not find those lovely IPv6 addresses friendly ?

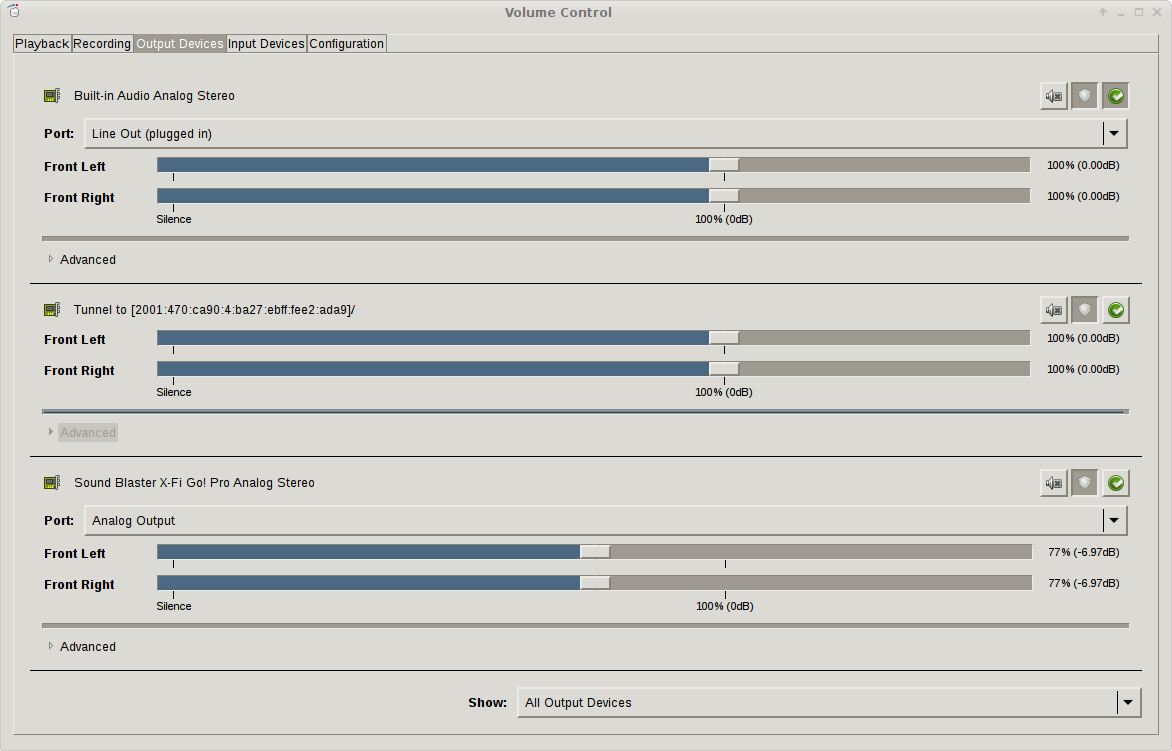
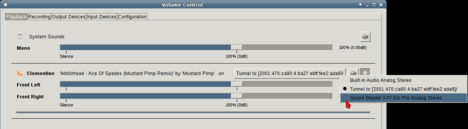
Anyway, log out of your X session, log back in and you’re in business… You have a new output device waiting for you in the Pulseaudio volume control:

Pulseaudio remote device selection

So now, while some of your sound applications (such as the sweet Clementine music player pictured here) plays, you can switch it to the remote device:

Using Pulseaudio volume control to choose a remote device to stream a local playback to.

That’s all folks – it just works !

While you are joyously listening to remote music, let’s have a word about sound quality. As any sound circuit integrated on a motherboard where it cohabits with a wild bunch of RF emitters, the Raspberry Pi’s sound is bad. The Model B+ claims “better audio – the audio circuit incorporates a dedicated low-noise power supply” but actual testing shows that it is just as bad and sometimes even worse. So I did what I nowadays always do to get decent sound: use a cheap sound adapted on a USB dongle, in the present case a ‘Creative Sound Blaster X-FI Go Pro’ which at 30€ gets you a great bang for the buck.

Luck has it that the Raspberry Pi’s Pulseaudio offers it as the default sink – so I did not have to specify anything in my client configuration. But that may or may not be the case on yours – in which case you must use module-tunnel-sink-new’s sink parameter to tell it which sink to use. Since the Raspberry Pi’s Pulseaudio runs in system mode, you won’t be able to ‘pactl list sinks’ so you’ll have to detour through a run in debug mode to know the name of the sinks available.

Sound quality is also a reason why this method is better than a really long stereo line extension cord whose attenuation would degrade sound noticeably.

Well, that was verbose and long winded – but I hope to have clearly covered everything… If I there is anything you feel I should explain better, please ask questions in the comments !

Networking & telecommunications and Systems administration28 May 2015 at 14:01 by Jean-Marc Liotier
1  15.895697 2600:480e:4000:c00::3 -> 2001:470:1f12:425::2 DNS 94
  Standard query 0x896c  A wwW.ruWeNZORI.net
2  15.901855 2600:480e:4000:c00::7 -> 2001:470:1f12:425::2 DNS 94
  Standard query 0xe3e6  A Www.RuWEnzoRi.neT
3  16.557423 2600:480e:4000:c00::7 -> 2001:470:1f12:425::2 DNS 93
  Standard query 0x5040  A KiVu.grabEuH.COm
4  16.566121 2600:480e:4000:c00::3 -> 2001:470:1f12:425::2 DNS 93
  Standard query 0x9c91  A KIVU.grabeUH.cOM
5  17.211708 2600:480e:4000:c00::9 -> 2001:470:1f12:425::2 DNS 94
  Standard query 0x7b36  AAAA www.RUWENzORi.net
6  17.888244 2600:480e:4000:c00::9 -> 2001:470:1f12:425::2 DNS 93
  Standard query 0xc582  AAAA KiVu.gRabEUH.com
7  18.041786 2600:480e:4000:c00::7 -> 2001:470:1f12:425::2 DNS 93
  Standard query 0xcb72  AAAA Kivu.GRABEUh.coM

Well… WTF ? Who let the script kiddies out ? No one… Surprisingly: those are actually perfectly well-formed queries, using “0x20 Bit encoding“.

This technique was introduced in a 2008 paper, “Increased DNS Forgery Resistance Through 0x20-Bit Encoding – SecURItY viA LeET QueRieS” :

“We describe a novel, practical and simple technique to make DNS queries more resistant to poisoning attacks: mix the upper and lower case spelling of the domain name in the query. Fortuitously, almost all DNS authority servers preserve the mixed case encoding of the query in answer messages. Attackers hoping to poison a DNS cache must therefore guess the mixed-case encoding of the query, in addition to all other fields required in a DNS poisoning attack. This increases the difficulty of the attack”.

For example, Tor uses it by default for name lookups that a Tor server does on behalf of its clients.

Of course, this clever exploitation of a fortuitous behaviour did not go without inducing bugs… What a surprise !

Well… One less mystery.

Debian and Networking & telecommunications and Systems administration13 May 2015 at 13:34 by Jean-Marc Liotier

Upon reboot after upgrading yet another Debian host to sweet Jessie, I  was dismayed to lose connectivity – a slight annoyance when administering through the Internet. Later, with screen & keyboard attached to the server, I found that the Intel Ethernet interface using the e1000e module had not come up on boot… A simple ‘ip link set eth0 up’ fixed that… Until the next reboot.

/etc/network/interfaces was still the same as before upgrade, complete with the necessary ‘auto eth0’ line present before the ‘iface eth0 inet static’ line. And everything was fine once the interface had been set up manually.

Looking at dmesg yielded an unusual “[    1.818847] e1000e 0000:00:19.0 eth0: Unsupported MTU setting” – strange, considering I had been using a 9000 bits MTU without issue before… That error message let me to the cause of my problem: the driver maintainer chose that from kernel 3.15 onwards, calculation of the Ethernet frame’s length always takes into account the VLAN header, even when none is present… And I was running Linux 3.16:

diff --git a/drivers/net/ethernet/intel/e1000e/netdev.c b/drivers/net/ethernet/intel/e1000e/netdev.c
index d50c91e..165f7bc 100644
--- a/drivers/net/ethernet/intel/e1000e/netdev.c
+++ b/drivers/net/ethernet/intel/e1000e/netdev.c
@@ -5687,7 +5687,7 @@ struct rtnl_link_stats64 *e1000e_get_stats64(struct net_device *netdev,
 static int e1000_change_mtu(struct net_device *netdev, int new_mtu)
 {
     struct e1000_adapter *adapter = netdev_priv(netdev);
-    int max_frame = new_mtu + ETH_HLEN + ETH_FCS_LEN;
+    int max_frame = new_mtu + VLAN_HLEN + ETH_HLEN + ETH_FCS_LEN;
 
     /* Jumbo frame support */
     if ((max_frame > ETH_FRAME_LEN + ETH_FCS_LEN) &&

As the author remarked: “The hardware has a set limit on supported maximum frame size (9018), and with the addition of the VLAN_HLEN (4) in calculating the header size (now it is 22) , the max configurable MTU is now 8996”.

So there…

diff --git a/network/interfaces b/network/interfaces
index ee4e27d..a094569 100644
--- a/network/interfaces
+++ b/network/interfaces
@@ -7,7 +7,7 @@ iface lo inet loopback

 auto eth0
 iface eth0 inet static
-       mtu 9000
+       mtu 8996
        address 10.128.0.2
        network 10.128.0.0
        netmask 255.255.255.0

And a reboot later the host is still connected – problem solved. Now to avoid fragmentation I’ll have to set a few other hosts’ MTU to 8996 too… Damn.

Military and Security and Systems administration15 Jun 2013 at 9:28 by Jean-Marc Liotier

In a message I got through Glyn Moody, Mikko Hypponen noticed this claim from German intelligence agencies :

Ist die eingesetzte Technik auch in der Lage, verschlüsselte Kommunikation (etwa per SSH oder PGP) zumindest teilweise zu entschlüsseln und/oder auszuwerten?“

„Ja, die eingesetzte Technik ist grundsätzlich hierzu in der Lage, je nach Art und Qualität der Verschlüsselung

My rough translation of these sentences of the article he linked :

„Are the current techniques capable of at least partially deciphering encrypted communications such as SSH or PGP ?“

„Yes, the current techniques are basically capable of that, depending on the type and quality of the encryption“

Of course, the weakness of weak keys is not exactly news… But it is always interesting when major threats brag about it openly – so this is nevertheless a pretty good refresher to remind users to choose the most current algorithms at decent key length and expire old keys in due time.

It is also a reminder that today’s cyphers will be broken tomorrow: encryption is ephemeral protection… Secret communications require forward secrecy & anonymity – for example, XMPP chat may use a server available as a Tor hidden service, with the clients using Off The Record messaging.

Meta and Systems administration28 May 2013 at 15:25 by Jean-Marc Liotier

I fixed the comments form today – it had been inoperative for two months. Thanks to Loïc for reporting the malfunction – fixing a problem is usually not difficult as long as someone reports it… If you like the software you use, reporting problems is an easy and doubly self-gratifying way to give back : good bug reports are  not only valuable contributions for altruistic reasons, they are also  rewarded by improvements !

Anyway, this is yet another lesson in keeping WordPress plugins up to date – or maybe a hint that more WordPress plugins really should be packaged in my favorite distribution

Systems administration02 Mar 2013 at 11:27 by Jean-Marc Liotier

Chrome isolates the content of each domain’s tabs in a separate process – which lets the user manage each of them with the operating system’s native process management tools. Firefox does not – so when it starts hogging 100% CPU, users are clueless.

Among the usual suspects is Flash, but Flash is innocent on my workstation’s Iceweasel : I entirely removed any Flash interpreter from it and I am now clean from this filth.

Next in the suspect row is misbehaving Javascript, unless you are my friend Lerouge and surf with NoScript buttoned-up. But how to identify it ?

As I expected, the answer was awaiting me among debugging tools – but it took longer than I estimated because it laid in the misleadingly named Javascript Deobfuscator extension… It does deobfuscate somewhat but as a commenter suggested it should really be named Javascript Execution Monitor because its major value addition is actually telling you what runs and when.

In the Javascript Deobfuscator dialog’s second tab, watch the “Number of calls” field – that is all you need. It is not a direct measure of CPU usage, but a close enough proxy : find the function with a runaway number of calls and you will likely have caught the culprit.

And that’s it – Iceweasel’s CPU usage is back to near zero, where it belongs. In my case, among the ocean of open tabs in on my virtual desktop’s many open windows, the culprit was this page to whose incompetence I grant some Pagerank as a token of appreciation for having led me to discover a solution to this problem !

Now, what I would love the Javascript Execution MonitorDeobfuscator to acquire is a list of the top call rates, by page and by script – updated every second. Make that a separate extension and call it the Javascript Execution Monitor !

Networking & telecommunications and Systems administration and Unix06 Jun 2012 at 11:48 by Jean-Marc Liotier

Today is IPv6 party time so let’s celebrate with a blog post !

Reliable IPV6 connectivity is no longer just nice to have – it is a necessity. If your Internet access provider still does not offer proper native IPv6 connectivity, your next best choice is to use an IPv4 tunnel to an IPv6 point of presence. It works and on the client side it only requires this sort of declaration in /etc/network/interfaces :

auto ipv6-tunnel-he
  iface ipv6-tunnel-he inet6 v4tunnel
  address 2001:170:1f12:425::2
  netmask 64
  endpoint 216.66.84.42
  gateway 2001:170:1f12:425::1

Of course, the same sort of configuration is required at the other endpoint – which means that, among other parameters, you must inform the IPv6 tunnel server of the IPv4 address of the client endpoint. Hurricane Electric, my tunnel broker lets me do that manually through its web interface – which is fine for a static configuration done once, but inadequate if your Internet access provider won’t supply you with a static IPv4 address. By the way, even if, after a few weeks of use, you believe you have a static address, you might just have a dynamic address with a rather long DHCP lease…

But Hurricane Electric also provides a primitive HTTP API that lets you inform the tunnel broker of IPv4 address changes – that is all we need to do it automatically every time our Internet access goes up. Adding this wget command to the uplink configuration stanza in /etc/network/interfaces does the trick :

auto eth3
iface eth3 inet dhcp
  up wget -O /dev/null https://USERNAME:PASSWORD@ipv4.tunnelbroker.net/ipv4_end.php?tid=34764

That’s it – you now can count on IPv6 connectivity, even after a dynamic IPv4 address change.

And after you are done, go test your IPv6 configuration and your IPv6 throughput !

Debian and Networking & telecommunications and Systems administration and Unix17 Oct 2011 at 11:03 by Jean-Marc Liotier

I just wanted to create an Apache virtual host responding to queries only over IPv6. That should have been most trivial considering that I had already been running a dual-stacked server, with all services accessible over both IPv4 and IPv6.

Following the established IPv4 practice, I set upon configuring the virtual host to respond only to queries directed to a specific IPv6 address. That is done by inserting the address in the opening of the VirtualHost stanza : <VirtualHost [2001:470:1f13:a4a::1]:80> – same as an IPv4 configuration, but with brackets around the address. It is simple and after adding an AAAA record for the name of the virtual host, it works as expected.

I should rather say it works even better than expected : all sub-domains of the second-level domain I’m using for this virtual host are now serving the same content that the new IPv6-only virtual host is supposed to serve… Ungood – cue SMS and mail from pissed-off users and a speedy rollback of the changes; the joys of cowboy administration in a tiny community-run host with no testing environment. As usual, I am not the first user to fall into the trap. Why Apache behaves that way with an IPv6-only virtual host is beyond my comprehension for now.

Leaving aside the horrible name-based hack proposed by a participant in the Sixxs thread, the solution is to give each IPv6-only virtual host his own IPv6 address. Since this server has been allocated a /64 subnet yielding him 18,446,744,073,709,551,616 addresses, that’s quite doable, especially since I can trivially get a /48 in case I need 1,208,925,819,614,629,174,706,176 more addresses. Remember when you had to fill triplicate forms and fight a host of mounted trolls to justify the use of just one extra IPv4 address ? Yes – another good reason to love IPv6 !

So let’s add an extra IPv6 address to this host – another trivial task : just create an aliased interface, like :

auto eth0:0
    iface eth0:0 inet6 static
    address 2001:470:1f13:a4a::1
    netmask 64
    gateway 2001:470:1f12:a4a::2

The result :

SIOCSIFFLAGS: Cannot assign requested address
Failed to bring up eth0:0.

This is not what we wanted… You may have done it dozens of time in IPv4, but in IPv6 your luck has ran out.

Stop the hair pulling right now : this unexpected behavior is bug – this one documented in Ubuntu, but I confirm it is also valid on my mongrel Debian system. Thanks to Ronny Roethof for pointing me in the right direction !

The solution : declare the additional address in a post-up command of the main IPv6 interface (and don’t forget to add the post-down command to kee things clean) :

auto he-ipv6
iface he-ipv6 inet6 v4tunnel
    address 2001:470:1f12:a4a::2
    netmask 64
    endpoint 216.66.84.42
    local 212.85.152.17
    gateway 2001:470:1f12:a4a::1
    ttl 64
    post-up ip -f inet6 addr add 2001:470:1f13:a4a::1 dev he-ipv6
    pre-down ip -f inet6 addr del 2001:470:1f13:a4a::1 dev he-ipv6

And now the IPv6-only virtual hosts serves as designed and the other virtual hosts are not disturbed. The world is peaceful and harmonious again – except maybe for that ugly post-up declaration in lieu of declaring an aliased interface the way the Unix gods intended.

All that just for creating an IPv6 virtual host… Systems administration or sleep ? Systems administration is more fun !

Free software and Mobile computing and Systems administration and Technology and Unix09 Aug 2011 at 11:17 by Jean-Marc Liotier

Oh noes – I’m writing about a Google product, again. The omnipresence of the big G in my daily environment is becoming a bit excessive, so I’m stepping up my vigilance about not getting dependent on their services – though I don’t mind them knowing everything about me. In that light, acquiring another Android communicator may not seem logical, but I’m afraid that it is currently the choice of reason : I would have paid pretty much any price for a halfway decent Meego device, but Nokia’s open rejection of its own offspring is just too disgusting to collude with. The Openmoko GTA04 is tempting, but it is not yet available and I need a device right now.

Android does not quite mean I have to remain attached to the Google tit : thanks to CyanogenMod there is now an Android distribution free of Google applications  – and it also offers a variety features and enhancements… Free software is so sweet !

As a bonus, CyanogenMod is also free of the hardware manufacturer’s pseudo-improvements or the carrier’s dubious customizations – those people just can’t keep themselves from mucking with software… Please keep to manufacturing hardware and providing connectivity – it is hard enough to do right that you don’t have to meddle and push software that no one wants !

So when I went shopping for a new Android device after my one year old daughter disappeared my three year-old HTC Magic, I made sure that the one I bought was compatible with CyanogenMod. I chose the Motorola Defy because it is water-resistant, somewhat rugged and quite cheap too. By the way, I bought it free from access provider SIM lock – more expensive upfront, but the era of subsidized devices is drawing to an end and I’m going to enjoy the cheaper subscriptions.

On powering-on the Defy, the first hurdle is to get past the mandatory Motoblur account creation – not only does Motorola insist on foisting its fat supplements on you, but it won’t let you access your device until you give it an email address… In case I was not already convinced that I wanted to get rid of this piece of trash, that was a nice reminder.

This Defy was saddled with some Android 2.2.2 firmware – I don’t remember the exact version. I first attempted to root it using Z4root, but found no success with that method. Then I tried with SuperOneClick and it worked, after some fooling around to find that USB debugging must not be enabled until after the Android device is connected to the PC – RTFM !  There are many Android rooting methods – try them until you find the one that works for you : there is much variety in the Android ecosystem, so your mileage may vary.

Now that I have gained control over a piece of hardware that I bought and whose usage  should therefore never have been restricted by its manufacturer in the first place, the next step is to put CyanogenMod on it. Long story short : I fumbled with transfers and Android boot loader functionalities that I don’t yet fully understand, so I failed and bricked my device. In the next installment of this adventure, I’m sure I’ll have a nice tale of success to tell you about – meanwhile this one will be a tale of recovery.

This brick situation is a Motorola Defy with blank screen and a lit white diode on its front. The normal combination of the power and volume keys won’t bring up the boot loader’s menu on start. But thanks to Motorola’s hardware restrictions designed to keep the user from modifying the software, the user is also kept from shooting himself in the foot and the Defy is only semi-bricked and therefore recoverable. Saved by Motorola’s hardware restrictions… Every cloud has a silver lining. But had the device been completely open and friendly to alien software, I would not have had to hack at it in the first place, I would not had bricked it and there would have been no need for saving the day – so down with user-hostile hardware anyway !

With the Motorola Defy USB drivers installed since the SuperOneClick rooting, I launched RSD lite 4.9 which is the Motorola utility for flashing Motorola Android devices. Here is the method for using RSD lite correctly. RSD lite immediately recognized the device connected across the USB cord. The trick was finding a suitable firmware in .sbf format. After a few unsuccessful attempts with French Android versions, I found that JRDNEM_U3_3.4.2_117-002_BLUR_SIGN_SIGNED
_USAJRDNEMARAB1B8RTGB035.0R_USAJRDNFRYORTGB_P003_A002_HWp3_Service1FF
worked fine and promptly booted me back to some factory default – seeing the dreaded Motoblur signup screen was actually a relief, who would have thought ?

After re-flashing with RSD Lite, I found that there is a Linux utility for flashing Motorola Android devices :  sbf_flash – that would have saved me from borrowing my girlfriend’s Windows laptop… But I would have needed it for SuperOneClick though – isn’t it strange that support tools for Android are Windows-dependent ?

With CyanogenMod in place, my goal will be to make my personal information management system as autonomous as possible – for example I’ll replace Google Contacts synchronization with Funambol. CyanogenMod is just the starting point of trying to make the Android system somewhat bearable – it is still the strange and very un-Unixy world of Android, but is a pragmatic candidate for mobile software freedom with opportunities wide open.

But first I have to successfully transfer it to my Android device’s flash memory… And that will be for another day.

If you need further information about hacking Android devices, great places are Droid Forums and the XDA-Developpers forum – if you don’t go directly, the results of your searches will send you there anyway.

Systems administration02 Mar 2011 at 22:13 by Jean-Marc Liotier

Today I landed my mandatory corporate Windows laptop at a desk supporting a nice 24″ monitor. Willing to take advantage of the available extra display real estate, I plug the DE-15F cable into the laptop’s D-subminiature video port and proceed to set the extra monitor’s resolution in the “Settings” tab of the “Display Properties” dialog. Alas 1280×800 pixels is the most I can set – it is the laptop’s main display’s resolution and it is far below the 1920×1200 pixels the secondary display is capable of. Shutting off and on the monitor, disconnecting and reconnecting the cable on the laptop’s port, putting the laptop to sleep and even rebooting… Nothing worked : it seemed that the system was not detecting the monitor properly and chose to handle it with some sort of default resolution. I even uninstalled the operating system’s monitor drivers – with no visible result.

Suspecting a hardware problem I decided to check all the connections. A quarter of a century of experience has taught me that connections are the most frequent cause of incidents. I reseated and properly screwed the cable to the monitor… And I was mildly surprised to see the display properties settings tab let me choose the monitor’s nominal resolution at last. My instincts had been vindicated.

What happened was a loose VGA cable. All the pins necessary for display were making contact, but some of the ones necessary for plug’n’pray detection were not. Mere visual inspection could not have found that – only reseating the connector makes the problem evident by solving it. I’m not sure I would be able to misconnect the cable just right to reproduce this situation if I wanted to…

And that’s how I learned about Display Data Channel, a collection of digital communication protocols between a computer display and a graphics adapter that enables the display to communicate its supported display modes to the adapter. I’m sure you won’t resist following this link to learn about DDC1, DDC2, DDC/CI and E-DDC to understand some basic technology working in the shadows, taken for granted until it stops functioning…

Code and Free software and Networking & telecommunications and Systems administration and Unix01 Mar 2011 at 20:06 by Jean-Marc Liotier

I loathe Facebook and its repressive user-hostile policy that provides no value to the rest of the Web. But like that old IRC channel known by some of you, I keep an account there because some people I like & love are only there. I seldom go to Facebook unless some event, such as a comment on one of the posts that I post there through Pixelpipe, triggers a notification by mail. I would like to treat IRC that way: keeping an IRC application open and connected is difficult when mobile or when using the stupid locked-down mandatory corporate Windows workstation, and I’m keen to eliminate that attention-hogging stream from my environment – especially when an average of two people post a dozen lines a day, most of which are greetings and mealtimes notifications. But when a discussion flares up there, it is excellent discussion… And you never know when that will happen – so you need to keep an eye on the channel. Let’s delegate the watching to some automation !

So let me introduce to you to my latest short script : bipIRCnickmailnotify.sh – it sends IRC log lines by mail when a specific string is mentioned by other users. Of course in the present use case I set it up to watch for occurrences of my nickname, but I could have set it to watch any other string. The IRC logging is done by the bip IRC proxy that among other things keeps me permanently present on my IRC channels of choice and provides me with the full backlog whenever I join with a regular IRC client.

This Unix shell script also uses ‘since’ – a Unix utility similar to ‘tail’ that unlike ‘tail’ only shows the lines appended since the last execution. I’m sure that ‘since’ will come handy in the future !

So there… I no longer have to monitor IRC – bipIRCnickmailnotify.sh does it for me.

With trivial modification and the right library it could soon do XMPP notifications too – send me an instant message if my presence is ‘available’ and mail otherwise. See you next version !

Networking & telecommunications and Security and Systems administration07 Feb 2011 at 13:04 by Jean-Marc Liotier

I work for a very large corporation. That sort of companies is not inherently evil, but it is both powerful and soulless – a dangerous combination. Thus when dealing with it, better err on the side of caution. For that reason, all of my browsing from the obligatory corporate Microsoft Windows workstation is done trough a SSH tunnel established using Putty to a trusted host and used by Mozilla Firefox as a SOCKS proxy. If you do that, don’t forget to set network.proxy.socks remote DNS to true so that you don’t leak queries to the local DNS server.

In addition to the privacy benefits, a tunnel also gets you around the immensely annoying arbitrary filtering or throttling of perfectly reasonable sites which mysterious bureaucracies add to opaquely managed exclusion lists used by censorship systems. The site hosting the article you are currently reading is filtered by the brain-damaged Websense filtering gateway as part of the “violence” category – go figure !

Anyway, back on topic – this morning my browsing took me to Internode’s IPv6 site and to my great surprise I read “Congratulations! You’re viewing this page using IPv6 (  2001:470:1f12:425::2 ) !!!!!”. A quick visit to the KAME turtle confirmed : the turtle was dancing. The surprising part is that our office LAN is IPv4 only and the obligatory corporate Microsoft Windows workstation has no clue about IPv6 – how could those sites believe I was connecting through IPv6 ? A quick ‘dig -x 2001:470:1f12:425::2’ cleared the mystery : the reverse DNS record reminded me that this address is the one my trusted host gets from Hurricane Electric’s IPv6 tunnel server.

So browsing trough a SOCKS proxy backed by a SSH tunnel to a host with both IPv4 and IPv6 connectivity will use IPv6 by default and IPv4 if no AAAA record is available for the requested address. This behaviour has many implications – good or bad depending on how you look at it, and fun in any case. As we are all getting used to IPv6, we are going to encounter many more surprises such as this one. From a security point of view, surprises are of course not a good thing.

All that reminds me that I have not yet made this host available trough IPv6… I’ll get that done before the World IPv6 Day which will come on 8th June 2011 – a good motivating milestone !

Brain dump and Debian and Free software and Systems administration and Unix17 Nov 2010 at 19:54 by Jean-Marc Liotier

On Identi.ca I stumbled upon this dent by @fabsh quoting @nybill : “Linux was always by us, for us. Ubuntu is turning it into by THEM, for us“.

It definitely relates to my current feelings.

When I set up an Ubuntu host, I can’t help feeling like I’m installing some piece of proprietary software. Or course that is not the case : Ubuntu is (mostly) free software and as controversial as Canonical‘s ambitions, inclusion of non-free software or commercial services may be, no one can deny its significant contributions to the advancement of free software – making it palatable to the desktop mass market not being the least… I’m thankful for all the free software converts that saw the light thanks to Ubuntu. But nevertheless, in spite of all the Ubuntu community outreach propaganda and the involvement of many volunteers, I’m not feeling the love.

It may just be that I have not myself taken the steps to contribute to Ubuntu – my own fault in a way. But as I have not contributed anything to Debian either, aside from supporting my fellow users, religiously reporting bugs and spreading the gospel, I still feel like I’m part of it. When I install Debian, I have a sense of using a system that I really own and control. It is not a matter of tools – Ubuntu is still essentially Debian and it features most of the tools I’m familiar with… So what is it ? Is it an entirely subjective feeling with no basis in consensual reality ?

It may have something to do with the democratic culture that infuses Debian whereas in spite of Mark Shuttleworth‘s denials and actual collaborative moves, he sometimes echoes the Steve Jobs ukase style – the “this is not a democracy” comment certainly split the audience. But maybe it is an unavoidable feature of his organization: as Linus Torvalds unapologetically declares, being a mean bastard is an important part of the benevolent dictator job description.

Again, I’m pretty sure that Mark Shuttleworth means well and there is no denying his personal commitment, but the way the whole Canonical/Ubuntu apparatus communicates is arguably top-down enough to make some of us feel uneasy and prefer going elsewhere. This may be a side effect of trying hard to show the polished face of a heavily marketed product – and thus alienating a market segment from whose point of view the feel of a reassuringly corporate packaging is a turn-off rather than a selling point.

Surely there is is more about it than the few feelings I’m attempting to express… But anyway – when I use Debian I feel like I’m going home.

And before you mention I’m overly critical of Ubuntu, just wait until you hear my feelings about Android… Community – what community ?

Systems administration23 Sep 2010 at 11:27 by Jean-Marc Liotier

This just cost me twenty minutes of hair pulling and from the number of unanswered forum and mailing lists mentions of this “Lost connection to MySQL server during query” error in the context of remote access through an SSH tunnel, posting the solution seems useful.

Letting mysqld listen to the outside is a security risk – and an unnecessary one for the common LAMP setup on which the applications are executed on the same server as the database server. As a result, many Mysql servers are configured with the “skip-networking” option which prevents it from listening for TCP/IP connections at all. Local communication is still possible through the mysql.sock socket.

Nowadays, communicating through local sockets is rather rare – connecting locally is usually done through the TCP/IP stack which is less efficient but more flexible. So the naive user who expects TCP/IP everywhere sets up a tunnel to the Mysql server he usually accesses locally, he provides the right connection parameters to his Mysql client – and on his connection attempt he gets the “Lost connection to MySQL server during query” error.

So – when connecting through ssh tunnel to a mysql daemon, you need to make sure that the “skip-networking” option has been removed from /etc/my.cnf

When the “skip-networking” option is active, network parameters are redundant. But once you remove it, for security’s sake you must make sure that mysqld does not listen to the outside – so check /etc/my.cnf so that the “bind-adress” parameter is set as “bind-address = 127.0.0.1”.

Consumption and Security and Systems administration09 Apr 2010 at 1:33 by Jean-Marc Liotier

Lexmark stubbornly refuses to make any effort toward providing, or at least letting other people provide, printer drivers for their devices – don’t buy from them if you need support for anything other than their operating system of choice.

After repeatedly acquiring throwaway inkjet printers from Lexmark and repeatedly wondering why my mother’s Ubuntu laptop can’t use them, my father finally accepted my suggestion of studying compatibility beforehand instead of buying on impulse – years of pedagogy finally paid off !

My parents required a compact wireless device supporting printing and scanning from their operating systems – preferably fast and silent, if possible robust and not too unsightly. No need for color, black and white was fine – though I would have pushed them toward color if multifunction laser printing devices capable of putting out colors were not so bulky. Those requirements led us toward the Samsung SCX-4500W.

I connected the Samsung SCX-4500W on one of the Ethernet ports of my parent’s router and went through the HTTP administration interface. The printing controls are extremely basic – but the networking configuration surprised me with a wealth of supported protocols : raw TCP/IP printing, LPR/LPD, IPP, SLP, UPnP, SNMP including SNMP v3, Telnet, email alert on any event you want – including levels of consumables… Anything I can think about printing on top of my mind is there. The funniest thing is that neither the product presentation, nor the specification sheet or the various reviews advertise that this device boasts such a rich set of networking features… Demure advertising – now that’s a novel concept !

I set-up wireless the printer’s 802.11 networking features, unplugged the Ethernet cable, rebooted the device… And nothing happened. No wireless networking, no error and, when I reconnected the Ethernet cable and got back to the administration interface, the radio networking menu was not even available anymore. After careful verification I could reliably reproduce that behaviour. At that stage, my parents were already lamenting the sorry state of the ever-unreliable modern technology – and most users would have been equally lost.

I pressed on and found that I was not alone in my predicament. User experiences soon led me to the solution : I had configured my parent’s radio network to use WPA with TKIP+AES encryption (the best option available on their access point) but the Samsung SCX-4500W was unable to support that properly. The administration interface’s radio networking menu proposed TKIP+AES but silently failed to establish a connection and seemed to screw the whole radio networking stack. Only setting my parent’s Freebox and all other devices on the network, to use TKIP only instead of TKIP+AES yielded a working setup with a reachable printer, at the cost of using trivially circumventable security to protect the network’s traffic from intrusion.

Now that is seriously bad engineering : not supporting a desirable protocol is entirely forgivable – but advertising it in a menu, then failing to connect without generating the slightest hint of an error message, and as a bonus wedging the user into an irrecoverable configuration is a grievous sin. I managed to overcome the obstacle, but this is a device aimed at the mass market and I can perfectly understand its target audience’s desire to throw it out of the window.

On that problem was solved, configuring the clients over the network was a breeze and pages of nice print were soon flying out quickly and silently. In summary, the Samsung SCX-4500W is a stylish printing and scanning device that lives up to its promises – apart from that nasty bug that makes me doubt Samsung’s quality control over its networking features.

Scanning with the Samsung SCX-4500W is another story entirely – it should work with the xerox_mfp SANE backend, but only through USB. For now I have found no hope of having it scan for a Linux host across the network.

Next Page »